
If you already live and breathe audio analysis, feel free to skip this bit and go straight to the tale of plugin architecture, notarization and mild host-induced despair.
A spectrogram is a way of visualising sound over time. Instead of just showing amplitude, like a waveform does, it shows:
- Time on the X-axis
- Frequency on the Y-axis
- Then the colour and brightness of the point in the plot is signal level at that frequency and time
So rather than seeing a wiggly blob of an audio waveform, and trying to infer what might be happening, you get to look at the actual spectral, frequency, structure of the audio. Tonal content shows up as lines. Broadband noise shows up as a fuzzy wash. Hum, whistle, hiss, plosives, rumble, clipping crud, harmonics and the other audio misdemeanours tend to reveal themselves as features on the plot.
This is why spectrograms are useful. They’re not just “fancy audio meters”. They are inspection tools. If you work with dialogue, restoration, editing, sound design, wildlife recordings, machine noises, or really anything where the frequency content matters, they let you answer questions that a waveform cannot.
A waveform is good for seeing where something happens. A spectrogram is good for seeing what kind of thing happened. If a clip has a nasty narrow-band whine at 8 kHz, a waveform will mostly shrug and carry on being a waveform. A spectrogram will point at it and say, “You. You horrible little blob there. Sort your life out.”
In the context of Final Cut Pro, this is handy because you often want to inspect program audio quickly while editing: look at dialogue texture, spot HVAC rumble, find high-frequency junk, compare left and right, freeze on a suspicious moment, or simply confirm that the thing you think you are hearing really is where you think it is.
A very practical example would be an A-roll piece to camera with a fan running somewhere in the room. You can hear there’s an annoying background tone, but before you start throwing filters at it you want to know roughly where it lives. On a spectrogram, that fan noise will often show up as a persistent horizontal line or band. Freeze the display, move the cursor over it, and you can read off the dominant frequency. At that point you are no longer guessing whether to try a notch around, say, a few hundred hertz or somewhere much higher up. You have an actual target, which is generally preferable to audio restoration by superstition.
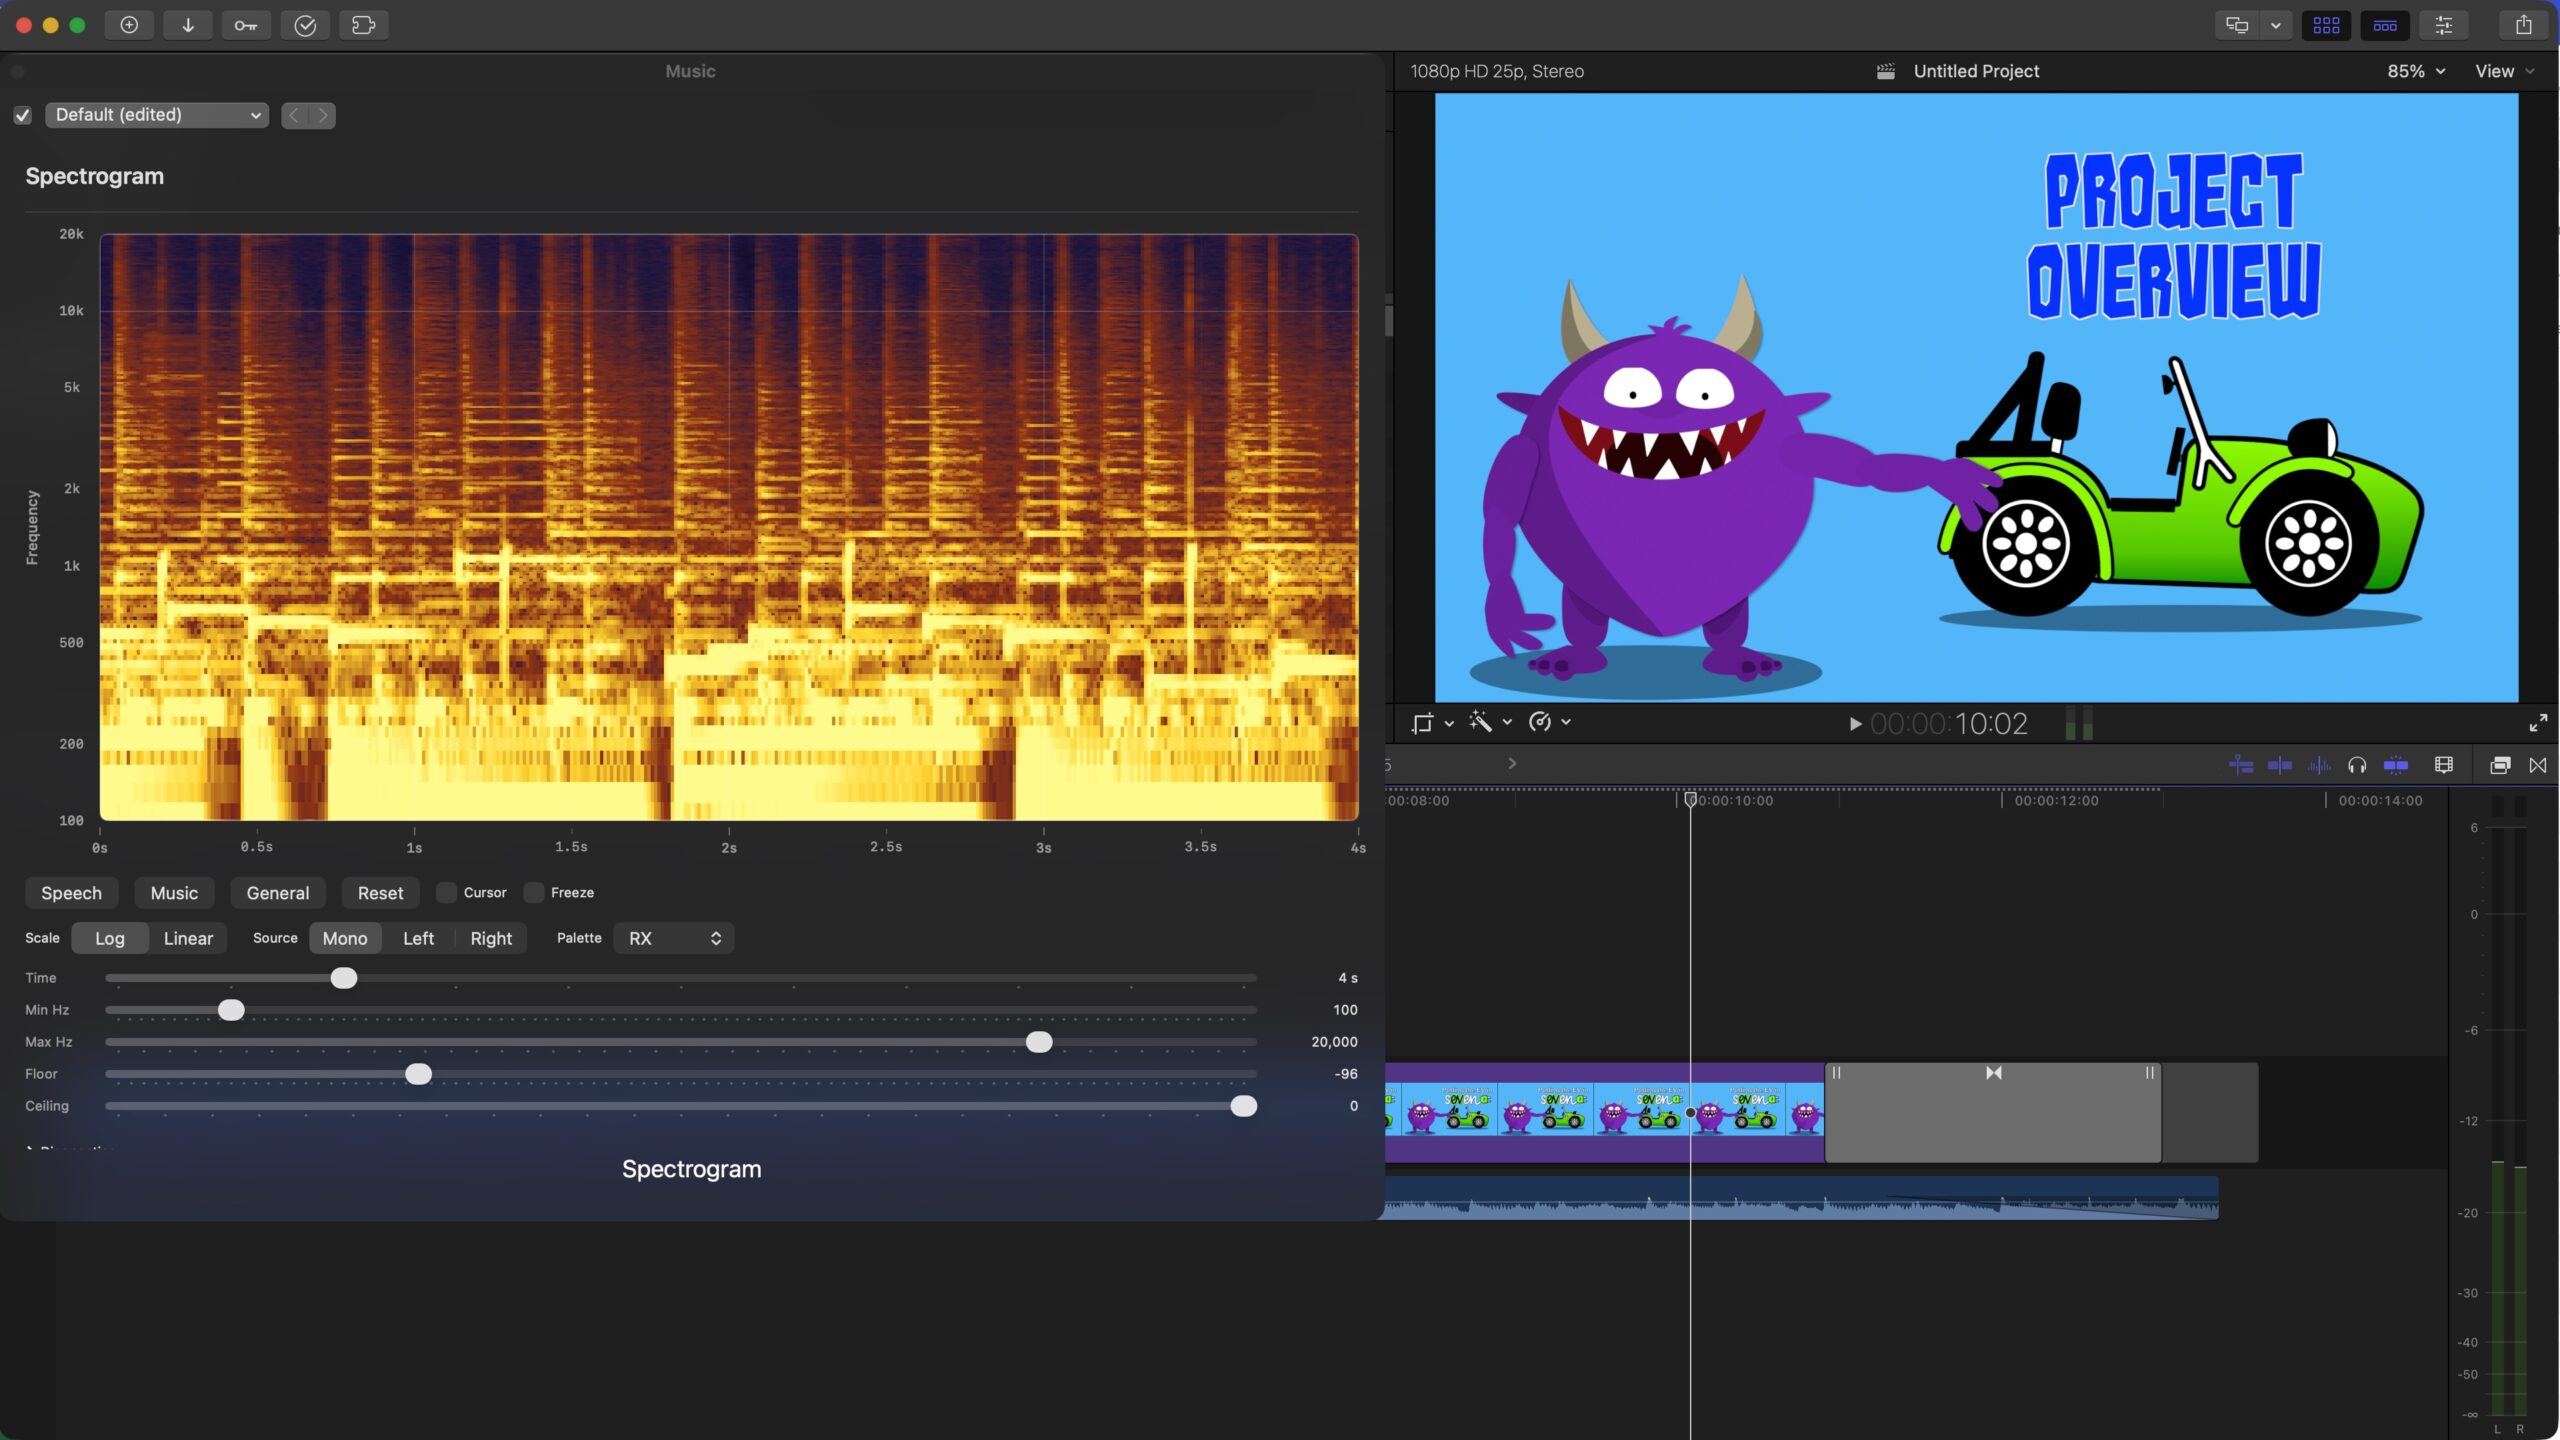
If you’re just interested in where this all ended up then here’s a quick video of the effect in action. You can see Final Cut Pro playing my Purplemeanie intro clip and the Spectrogram showing the spectral plot of the music as it plays. Neat huh?
So, in that video you should be able to see the spectrogram on the left reflecting the music being played in Final Cut Pro – new audio is added from right to left. The brighter the area of the graph, the louder that frequency is. So as you can imaging, a constant note would appear as a horizontal line on the plot.
And if anyone’s still reading and interested then you can find the code here:
https://github.com/Purplemeanie/Spectrogram
Every now and then I start a project because I have a crisp, well-bounded requirement and a neat technical plan. This was not one of those times.
This one started because I wanted a proper spectrogram while working in Final Cut Pro. Not a vague “audio is happening” meter. Not a decorative blob. I wanted something that would let me inspect dialogue, spot problems, freeze a frame, move a spot cursor around and generally look at the audio like a grown-up.
Final Cut Pro is the Apple video editing software I use for all my videos, and I knew I also needed to write my spectrogram effect code in Apple’s Xcode. Those two decisions then led me to fire up OpenAI’s Agentic Coding plugin to Xcode.
Codex is OpenAI’s Agentic Coding tool. It’s a specialised ChatGPT variant that plugs directly into the IDE (Interactive Development Environment) that you write and compile your code in. So in Xcode’s case that provides a panel on the left of the Xcode application that lets you enter your chat into. The really cool (and probably very dangerous) thing about that is that it then has access to all the the files in the folder you’re doing your project in. And it can then take you questions, and instructions, and modify those files. So if you want a new feature for your project that spans many source files, Codex can add the feature across all those files, build the project, run all the unit tests and then iterate to get what you wanted done, done! As a nearly 50 year software guy, this is spooky, bonkers, amazing and very very scary! In the entire run of this project Codex very rarely put a foot wrong, and while a few years ago these AI agents would often diverge from your goal, these days Codex is very capable of converging on a final product – as long at you know enough to keep it on track.
I subscribe to OpenAI (think ChatGPT) at the Plus level. Enough to get me access to Codex, but not enough to run Codex all day and night on a project like this – I soon realised I could easily run out of tokens with Codex work like this. So during the project I did also have to stump up for extra tokens to keep Codex from having a token break! (where it will tell you it can’t do anything more for a few hours while your token budget gets refilled).
So that all sounds simple enough (if you’re an Apple developer) until you actually try to answer the question: where does that spectrogram live in my Final Cut Pro workflow? In the video frame? In a plugin popup? In a standalone app? In some kind of low-rent oscilloscope built out of poor life choices? As it turned out, the answer was: “Yes, but no, and also definitely not that first one.”
Why I Did The Project
The practical reason is straightforward. I wanted a tool that would help me inspect audio in Final Cut Pro in a more forensic way. Spectrograms are great for this. They show structure that level meters and waveforms simply do not. If you are looking at dialogue, hum, hiss, rumble, broadband mess, high-frequency junk, or the spectral shape of a clip, a spectrogram gets useful very quickly.
The less practical reason is that this was also a very good excuse to kick the tyres on agentic coding in Xcode. Not in a toy repo. Not in a “build me a calculator” sort of way. In a real project with plugin architecture, DSP code, UI, packaging, code signing, notarization, host oddities and enough yak hair to knit a modest blanket.
Why FxPlug Wasn’t Right
I ended up being a bit too vague here with my starting questions to Codex. And so our initial instincts were to think in terms of Final Cut Pro effects, which very quickly leads you toward the FxPlug framework of API’s (Applications Programming Interfaces). And that sounds reasonable right up until you remember what I actually wanted.
I did not want to burn a spectrogram into the output video. I did not want a visual overlay. I wanted a live analysis UI in a popup/editor window. That is a very different product.
FxPlug is geared around image/video effect rendering. What I needed was an audio effect architecture that could sit on the signal path, see the audio buffers, and present a custom UI. So the architecture had to shift from “video plugin” to Audio Unit v3 effect. Once that clicked, a lot of the earlier confusion stopped being deep and started being merely annoying.
I stil ended up spending an evening working through an FxPlug project before the penny dropped that this wasn’t the right route. But that was all good practice as I was VERY rusty in Xcode!
The Spike: First, Prove Final Cut Pro Would Even Play Ball
So after wasting a bit of time on the FxPlug detour, we did the sensible thing: a spike.
(A spike is a quick, disposable prototype used to answer a specific technical question before investing in a full implementation. It exists to reduce uncertainty, not to be polished or production-ready.)
The spike had one job. Prove that Final Cut Pro would:
- load an AUv3 (Audio Unit) effect,
- show a custom SwiftUI editor view (Swift is Apple’s “modern” programming language),
- deliver live audio buffers to the output render path, and
- let us drive a scrolling display in the popup without everything exploding.
That all worked. Not in a production-ready way. Not in a “ship it this afternoon” way. But in a decisive enough way that it justified carrying on. We got a low-resolution spectral proof into the popup and confirmed Final Cut Pro was feeding stereo buffers during playback. In short: the route was viable.
Then Came The Plan
At that point I did what every engineer says they will do and then often doesn’t: I wrote a proper project plan.
The plan was not there to look managerial. It was there to stop the work degenerating into a thousand tiny “while I’m here…” decisions. Once you have AI helping with implementation, this becomes even more important. Without a plan, you are not accelerating; you are just letting the machine take a scenic route through your backlog.
AI systems have in the past often lost their way, diverging on the solution to a project, not converging… so a plan is also a way of reseting an AI to say, your lost, go back to the plan and remember what we’re doing and why. In the end I didn’t need to tell Codex to do this, but on lots of occasions it said it was re-reading the plan and I suspect we got a much better result because it did that.
The plan broke the work into phases with objectives, tasks, deliverables and exit criteria. The major chunks were:
- Phase 0: discovery and constraints, including killing off the wrong architecture.
- Phase 1: project scaffolding and a transparent AU pass-through shell.
- Phase 2: data model for spectrogram config, spectral slices and scrolling history.
- Phase 3: real-time-safe audio acquisition and handoff out of the render callback.
- Phase 4: production analysis path.
- Phase 5: rendering the scrolling spectrogram efficiently.
- Phase 6: AU/editor integration and host behaviour hardening.
- Phase 7: diagnostics, validation and measurement.
- Phase 8: packaging up the useful product behaviour rather than just a technical proof.
- Phase 9: release engineering, export, signing, notarization and DMG distribution.
- Phase 10: usability improvements and the “make it nice to use” sweep.
In other words: not just “build a spectrogram”, but “build a spectrogram and also get it to the point where a future-me doesn’t hate past-me.”
How The Phases Actually Played Out
The interesting thing about doing this with agentic coding in Xcode was not that the phases disappeared. But the phases became much more practical. You could take a slice (a small chunk of the phase that might be one or more bullet points), implement it, build it, inspect it, update the plan, and move on without a big stop-start cost.
Some of the more important steps were:
- getting a clean pass-through effect first, so we knew the host integration was sane,
- moving the analysis handoff out of “this is probably fine” territory and into something render-thread-safe,
- adding proper scrolling history and display controls,
- hardening the AU/editor lifecycle in Final Cut Pro,
- proving the distribution workflow on more than one Mac, and
- closing the loop on lots of small usability details that turn a proof into a tool.
There were also some useful dead ends.
For example, I spent some time chasing timeline synchronization because that is an obviously attractive feature. But once we instrumented the plugin properly it turned out that, in this path, Final Cut Pro was not providing the standard AU transport callbacks I had hoped for. That changed the plan. Rather than pretending the host was giving me timeline state it wasn’t, I re-scoped the work and treated internal continuity handling as the right thing to do. That is exactly the sort of correction a written plan is good at capturing.
Testing
One of the more useful habits in a project like this is to treat testing as more than just running unit tests at the end and hoping for the best. There are several different kinds of testing going on:
• Architectural testing: proving that the chosen plugin or app model can support the product idea at all.
• Slice testing: validating each vertical feature as it is added, rather than waiting for a giant integration moment.
• Behavioural testing: checking that the thing behaves properly in the real host application, not just in isolation.
• Operational testing: making sure signing, packaging, installation and distribution actually work on real machines.
So, in this project the first kind of testing was the spike. Before building the production version, I used a small, disposable prototype to answer the key technical questions: would Final Cut Pro load an AUv3 effect, would it show a custom SwiftUI editor, would it feed audio buffers to the render path, and could a live spectrogram-like view update in the popup. That spike was not production code, but it was valuable because it retired the biggest uncertainty early.
After that, the project was tested phase by phase. Pure model logic such as configuration handling, spectral slices and the scrolling history buffer could be covered with unit tests. Host integration work then had to be validated manually in Final Cut Pro, because that is where the real behavioural questions lived: does the popup open reliably, does playback drive the graph, do controls behave correctly, does the effect remain a transparent pass-through, and does it keep working after closing and reopening the editor.
The later phases added another class of testing: release and deployment testing. It was not enough for the project to run in Xcode. It also had to survive archive, export, signing, notarization, DMG packaging, installation on a second Mac, AU discovery, and a reboot. Those steps flushed out issues that ordinary development builds would never have revealed.
So the testing story here was not glamorous, but it was effective: use a spike to reduce uncertainty, test each vertical slice as it lands, verify host behaviour in the real application, and then test the operational path all the way to a signed and notarized distributable build.
We ended up with a fairly modest, but still very useful 23 unit tests in the project.
Phase 10 As An Example
Phase 10 is a good example of how the work shifted from “can we do this?” to “what makes this actually pleasant to use?”.
The candidate enhancements in Phase 10 ended up looking like this,
- frequency grid and scale labels,
- time tick marks,
- cursor readout for frequency, time and displayed dB,
- alternate colour maps,
- freeze mode,
- source channel selection: mono / left / right,
- internal discontinuity markers for effect-side resets,
- trimmed diagnostics for field debugging,
- Y-axis labelling, and
- a sober acknowledgement that screenshot “juice” export from inside the AU popup was not worth the “squeeze”.
That last one is worth dwelling on. At one point I tried to add PNG export from the popup. That went exactly the way these things often do: first it did nothing, then it beachballed (spinning beach ball cursor) Final Cut Pro, then it did nothing without beachballing, which was progress of a sort. In the end, the right decision was to back it out and defer it. A project improves just as much by removing the wrong feature as by adding the right one.
And in practice those bullet points turned into the following detailed plan for the phase. I know this is a big chunk of text, but it shows the detail that went into the planning of the phase (the text is in markdown format, which seems to work really well as an interface between real people and AI’s). X’s denote tasks that were completed and where they weren’t a note was added as to why (thank you from future-me!):
# Phase 10 — Nice-to-have enhancements

Current note: comparison against other Spectrogram software for the same speech material shows broadly similar voiced-structure output. That lowers the priority of further immediate investigation into the earlier "comb" concern and shifts focus toward usability enhancements.

## Next priority order

Historical note: this ordering is retained as a record of how Phase 10 was approached. Most of the high-value items in this list are now complete, deferred, or intentionally out of scope.

1. frequency grid / scale labels
2. optional time tick marks
3. screenshot/export current spectrogram image
4. cursor readout for frequency/time under pointer
5. alternate colour maps and further palette tuning

## Candidate enhancements
- [x] frequency grid / scale labels
  - Added a left-side frequency axis and matching horizontal guide lines inside the spectrogram view. Current scope is read-only guidance for linear/log display scales; pointer readout and denser labeling remain separate follow-up work.
- [x] optional time tick marks
  - Added a bottom time axis and matching vertical guide lines using the current visible time span. Current scope is a simple relative time ruler for the visible window; transport-linked absolute time remains separate future work.
- [x] cursor readout for frequency/time under pointer
  - Added a button-controlled hover crosshair and compact frequency/time/dB readout over the plotted spectrogram area. Current scope reports position within the visible window only; no host transport time yet.
  - Current dB value is derived from the displayed history sample under the cursor, not from the raw analyzer/bin data. Revisit if a more exact analysis readout becomes important.
- [x] alternate colour maps
  - Added two additional palette families (`Viridis` and `IceFire`) and retuned the existing heat palette, while keeping the RX-like palette as the default. Current scope is fixed palette selection only; no custom palette editor or per-palette scaling.
- [x] freeze mode
  - Added a user-controlled freeze toggle that stops visible history updates while leaving the rest of the display controls available. Current scope freezes the displayed spectrogram only; it is not a host transport hold or bookmark workflow.
- [ ] screenshot/export current spectrogram image
  - Deferred. AU-hosted file export from the Final Cut Pro popup proved unreliable due to extension/host UI constraints. Revisit only if there is a clear requirement to implement export via the containing app or another non-popup path.
- [ ] smoothing / temporal persistence controls
- [x] source channel selection (mono / left / right)
  - Added an explicit analysis-source selector so the spectrogram can be driven by summed mono, left-only, or right-only input without changing the visual layout. Current scope is source selection only, not a multi-panel stereo visualisation feature.
  - Critical rule for later timeline-sync work: changing source mode may reset only the effect's internal spectrogram history. It must never seek, rewind, or otherwise move the host timeline/playhead.
- [ ] peak-hold overlay
- [ ] adaptive dB scaling
- [ ] presets for dialogue, music, ambience
- [ ] optional compact mode for small AU popup sizes
- [ ] host transport/timeline-position integration if available
  - Current FCP constraint: this AU path is not receiving `transportStateBlock` or `musicalContextBlock`. Standard AU host callbacks are therefore not currently available for direct transport/timeline sync in Final Cut Pro.
  - Scope this as internal continuity handling first, host timeline labeling second only if a reliable FCP-specific signal is found later. The effect must always follow host transport state and must never adjust host timeline position.
  - Practical slices:
    - [x] Capture host transport diagnostics first, without changing graph behavior.
      - Current slice caches `AUAudioUnit.transportStateBlock` at render-resource allocation, samples host transport flags/sample position/cycle bounds during render, and surfaces them in popup diagnostics. This is observation-only groundwork for later discontinuity handling.
    - [x] Verify whether Final Cut Pro actually provides AU host transport callbacks in this plugin path.
      - Current result: no. Popup diagnostics showed `Host transport cb = missing`, `Host musical cb = missing`, `Host context = n/a`, and `Transport polls = 0/0` during playback. Do not assume direct host timeline position is available through standard AU callbacks here.
    - [ ] Define continuity-break events from the host side:
      - [ ] playhead jump / scrub if a trustworthy host signal becomes available later
      - [ ] loop wrap if a trustworthy host signal becomes available later
      - [ ] stop -> play restart if a trustworthy host signal becomes available later
      - [ ] clip/selection/context change if detectable from some non-AU callback path later
      - [x] freeze off -> resume live view
        - Current slice: unfreezing clears the current spectrogram segment and resumes with fresh live history. The host timeline is untouched.
      - [x] effect-side source mode change (graph reset only; no host transport change)
        - Current slice: changing `Mono/Left/Right` clears only the spectrogram history and overlap state so the new source starts a fresh graph segment. The effect does not seek, rewind, or otherwise move the host playhead.
    - [ ] Define per-event graph behavior:
      - [x] hard reset for source-mode changes
      - [ ] discontinuity marker for host transport jumps where preserving recent context is useful, if host jumps become detectable
      - [x] frozen graph remains as a snapshot while transport continues underneath it
      - [x] unfreezing starts a new live segment rather than catching up hidden history
    - [x] Add segment/discontinuity metadata to spectrogram history so the renderer can distinguish continuous spans from breaks caused by internal effect-side events first.
      - Current slice uses lightweight UI-side discontinuity marker state for internal resets. It does not attempt host timeline segmentation and does not modify spectral slice data yet.
    - [x] Render a clear discontinuity marker in the graph before attempting any timecode-aware ticks.
      - Current slice renders a dashed vertical separator for internal continuity resets such as source-mode changes and freeze resume.
    - [ ] Investigate whether any stable FCP-specific transport/timeline capture path exists outside standard AU callbacks.
    - [ ] Add timeline-aware tick labels only if a reliable host timeline signal is found after discontinuity handling is in place and freeze behavior is explicit.
- [ ] optional precomputed/offline analysis mode
- [x] Add `Frequency` label to the Y-axis
  - Delivered scope: the graph now shows a vertical `Frequency` label to the left of the frequency scale for clearer axis reading.
- [x] Trim diagnostics for field debugging
  - Delivered scope: reduced the diagnostics panel to a smaller field-debug set and split the display into two columns for easier scanning while retaining CSV copy.

### Phase 10 note
- Current conclusion: standard AU host callbacks in Final Cut Pro are not providing transport or musical-context data to this AU effect path, so true timeline/playhead synchronization is not currently available inside the AU popup.
- Apple-documented live timeline access does exist in other extension architectures:
  - Workflow Extensions via `ProExtensionHost` / `FCPXTimeline`
  - FxPlug timing APIs via `FxTimingAPI_v4`
- For this product, keep the AU-based spectrogram architecture and treat true host-timeline sync as out of scope unless a separate workflow-extension companion or a different plugin architecture is intentionally introduced later.
- Phase 10 is effectively closed for now. The delivered usability work covers the current practical needs, and the remaining unchecked items are either explicitly deferred, speculative, or tied to a future architectural change.
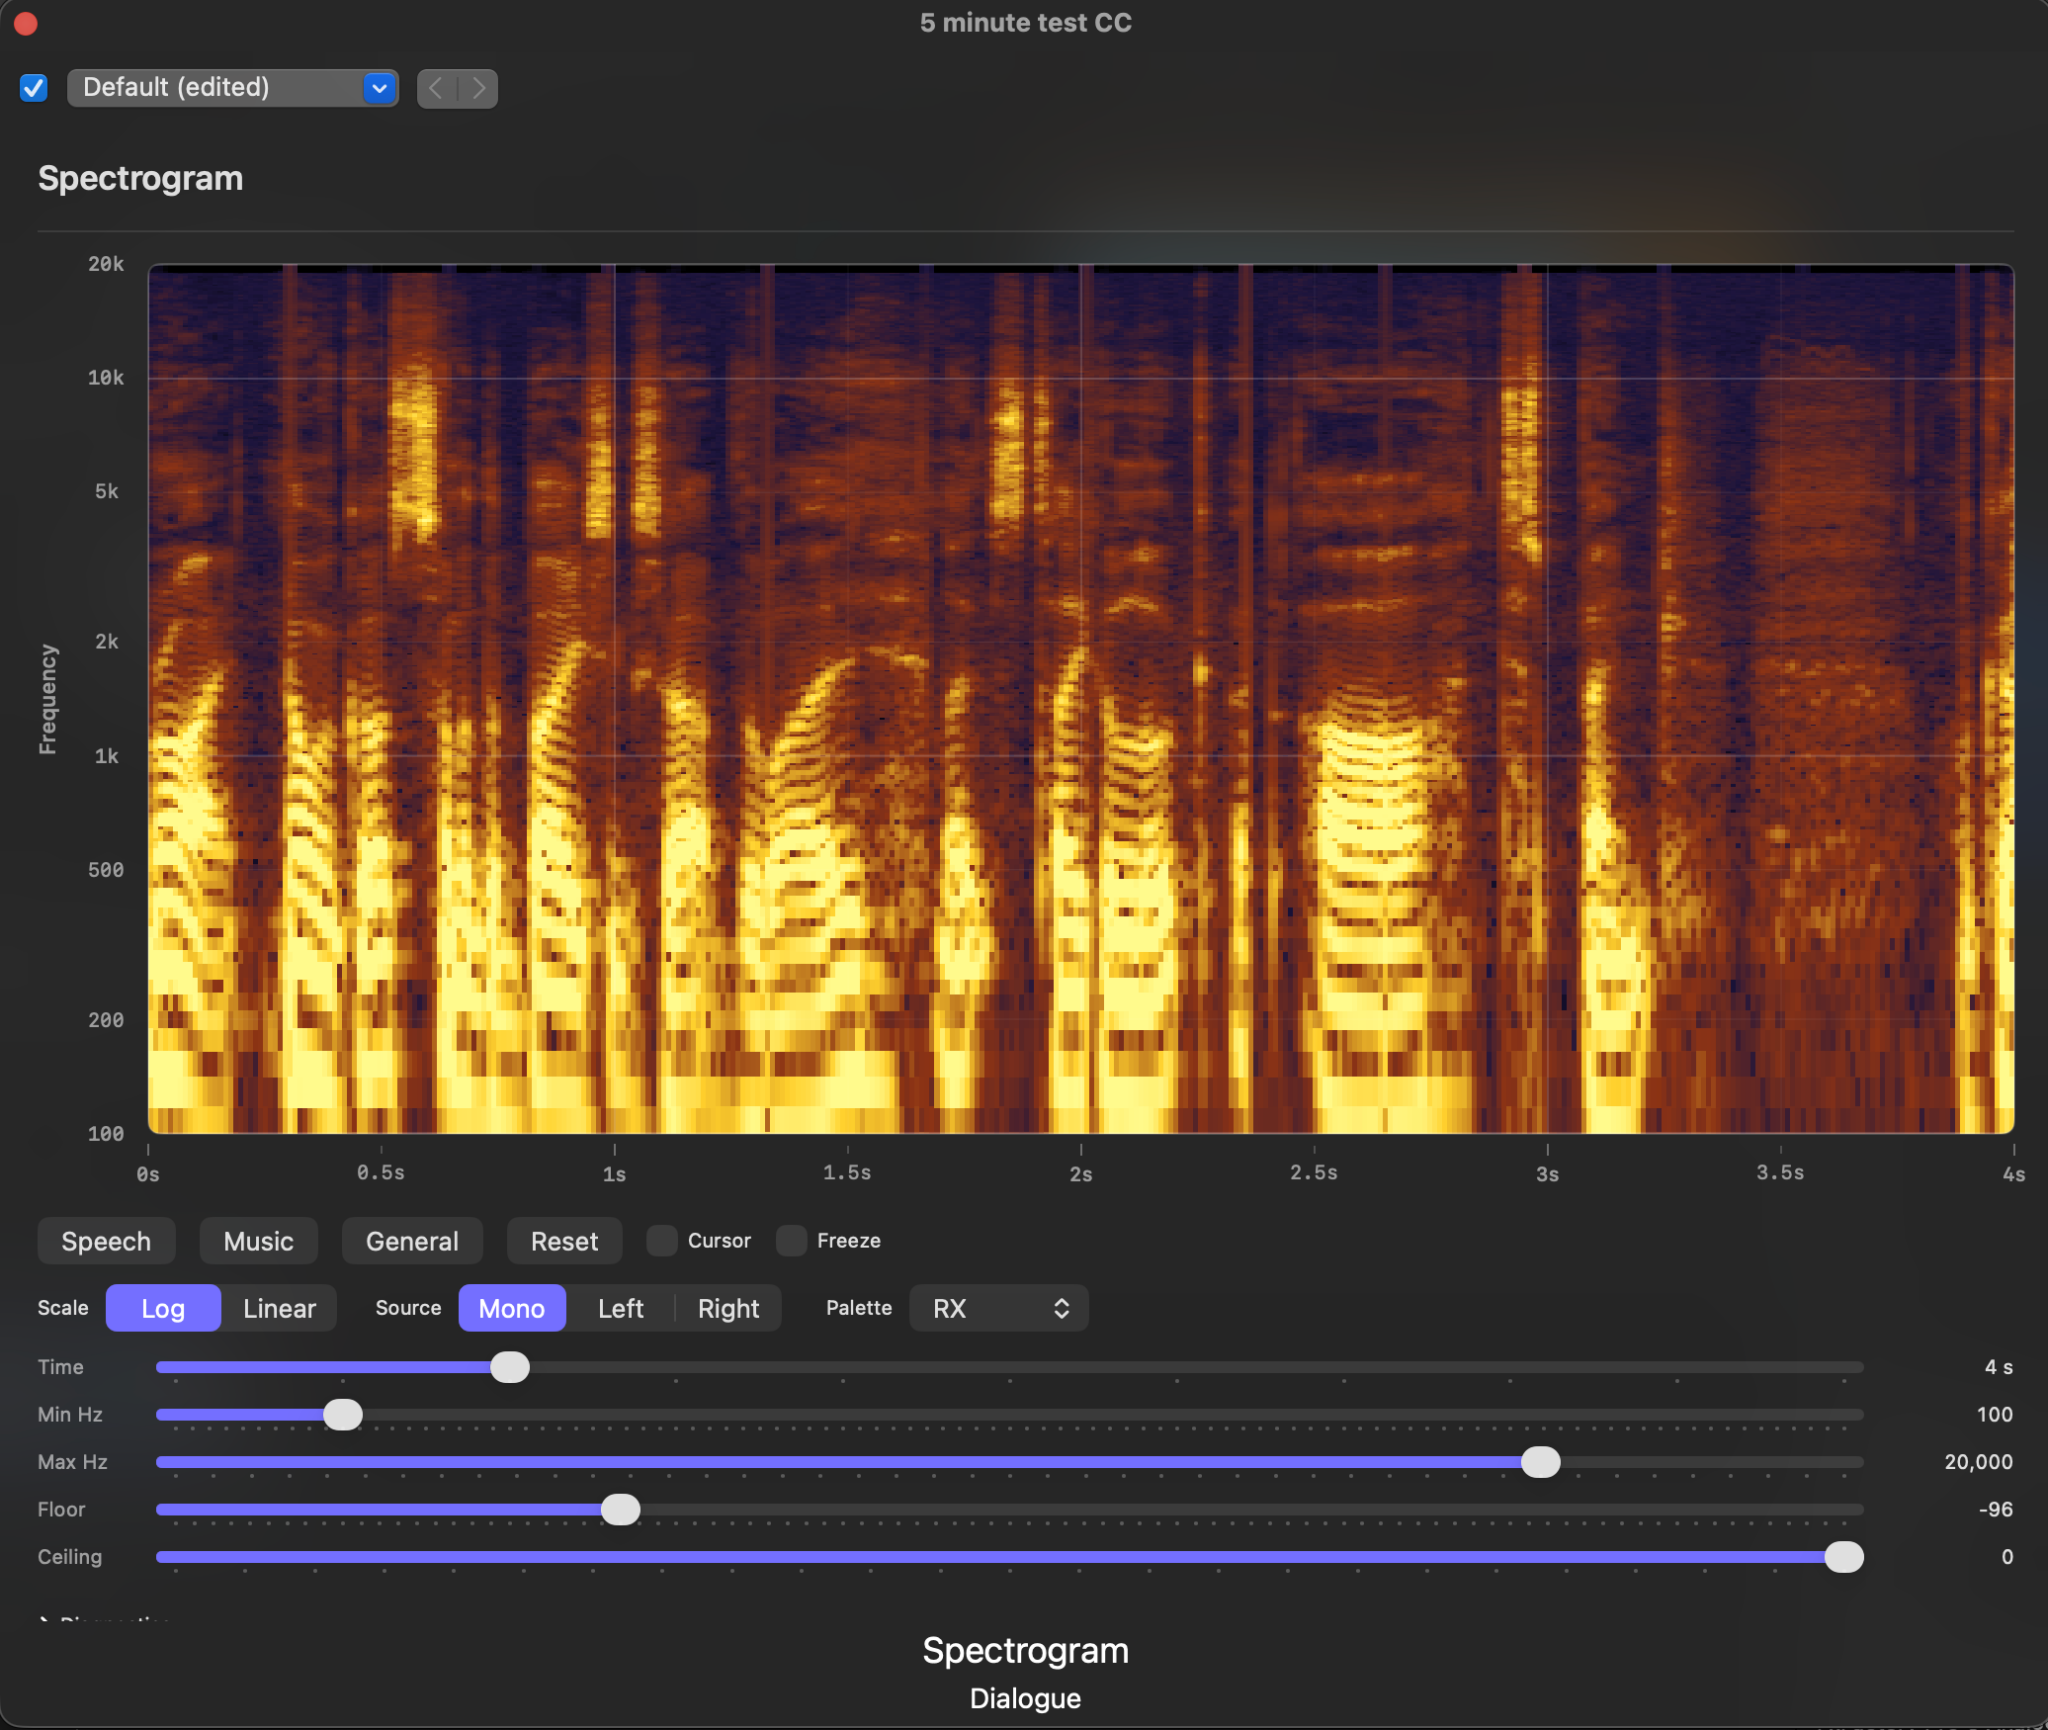
By the end of Phase 10 the popup had a frequency axis, time ticks, cursor readout, palette options, freeze, source selection, discontinuity markers and more compact diagnostics. In other words, it had graduated from “interesting proof” to “tool I would actually use”.
Release Engineering: The Part That Tries To Humble You
The other substantial bit of work was getting from “runs on my machine in Xcode” to “signed, notarized, installable DMG” that could be installed on other Macs (I do have a few I’m afraid).
The key lesson here was that for macOS distribution you really do need to follow the proper export path. The app that comes out of a normal Release build product is not the same thing as the app you get from Xcode’s archive and Direct Distribution export flow. If you package the wrong one, notarization will tell you, just not in a way that immediately improves your day.
Once that was straightened out, the pipeline became sane:
- archive in Xcode,
- export the Developer ID signed app,
- package the exported app into a DMG,
- notarize and staple the DMG, and
- verify install and Gatekeeper behaviour on another Mac.
The result is that the project is now in a parked but very usable state. It works, it is signed, it is notarized, and it has been exercised on more than one machine. That is a much nicer place to stop than “there is definitely something clever hiding in this branch somewhere.”
VSCodeCounter Snapshot
For anyone who likes a quick numerical smell test, here is the summary from the most recent VSCodeCounter run in the repo:
- Total: 53 files
- Code: 5,900 lines
- Comments: 406 lines
- Blank: 1,377 lines
- Total lines: 7,683
By language:
- Swift: 27 files, 3,502 lines of code
- Markdown: 13 files, 1,723 lines of code
- C++: 5 files, 474 lines of code
- JSON: 4 files, 95 lines of code
- Shell Script: 2 files, 57 lines of code
- XML: 1 file, 41 lines of code
- JSON with Comments: 1 file, 8 lines of code
The split is about what you would expect for this kind of project: mostly Swift, a little C++ where real-time and ownership concerns want tighter control, and quite a lot of Markdown because the plan and notes were not ornamental. They were part of the build system for my brain.
And in terms of workflow. I’d get Codex to tackle a slice, we’d refine that slice and get something working and tested. I’d verify it worked the way I wanted in Final Cut Pro and then we’d commit it to a Got repository I’d set up. Then once a phase was complete I’d “push” the commits for that phase to GitHub. That way we’d have milestones and checkpoints that we could revert to if we wanted to back-out anything that didn’t work and Codex couldn’t untwist (which didn’t happen).
This was all done in about 4 days. Some days were full on and some were more dabbling at the project. But 7,000 lines of usable code in 4 days! Crap that’s impressive!
What Was Relevant About Using Agentic AI
If you are technical and wondering whether agentic coding is useful for something like this, my answer in early 2026 is yes, with conditions.
The trick is not to treat the agent like a magic code fountain. The trick is to make it work inside a structure:
- have a plan,
- work in vertical slices,
- keep the architecture explicit,
- verify assumptions early,
- update docs as you go, and
- be prepared to kill off features that are technically possible but operationally stupid.
The agent was most useful when the work had a defined target:
- “add frequency grid and labels”,
- “figure out why notarization is failing”,
- “trim diagnostics for release debugging”,
- “re-scope timeline sync based on what the host actually exposes”,
- “update the plan and docs to match reality”.
Where it is less useful is if you skip the thinking and ask it to hallucinate a product strategy. You still need to decide what the product is. You still need to evaluate trade-offs. You still need to tell the machine when a line of attack is turning into nonsense.
In other words, the speed-up is real, but the steering wheel remains attached to the human.
[IMAGE PLACEHOLDER: screenshot of Xcode/Codex workflow or plan/checklist]
Conclusion
The conclusion I came away with is not just that the Spectrogram project worked out well. It is that agentic coding in Xcode is absurdly fast.
Not magically fast. Not “thinking is obsolete” fast. But properly, materially, project-changingly fast.
This was not a one-file demo. It was plugin architecture, DSP-adjacent code, SwiftUI, host integration, diagnostics, packaging, signing, notarization, documentation, planning and a steady stream of small design decisions. The agent was useful across all of that.
The speed came from being able to keep momentum. If I hit a problem, I could investigate it immediately. If I wanted a new slice, I could scope it and build it. If the architecture needed tightening, I could do that while the context was still warm. And crucially, I could keep the plan and the docs in lockstep with the code.
So the project ends this round in a very decent place: a functional Final Cut Pro spectrogram effect, a proven distribution path, and a clear forward branch if I ever want to turn the containing app into a standalone capture/analyzer tool as well.
Which is a much better result than the more traditional outcome of these experiments, namely an interesting folder full of almosts.
And of course… if you hadn’t guessed, this blog post was pretty much all written by Codex. Taking the style of my previous blogging, the contents of the project source, our conversation history and then creating a blog post. I’ve obviously edited it and added stuff along the way, but instead of this taking me a whole day (and then the evening when I hadn’t got it done in time) to write, I’ve put this together in an hour.
Now, I can see you all now… I know, I know, written by AI. But this website blog is not an exercise in me being a literally genius. It’s a way of documenting what I’ve done so future me can remember, and it’s a way of disseminating some of what I’ve learnt so others can benefit. As such the less time I spend writing these blogs then the more time I have to go and do more fun stuff. And to be honest, the AI probably does a better job at it than me!
Take care, and… happy Blatting!

Leave a Comment